Cleaning a toilet is one of those chores nobody looks forward to, yet it’s essential for maintaining a clean and hygienic bathroom. While most people focus on the toilet bowl, the tank is often overlooked. However, a dirty toilet tank can cause grime and mineral buildup that not only affects the toilet’s performance but can also lead to unpleasant odors and a breeding ground for bacteria.
Luckily, my grandpa taught me a simple trick to clean a dirty toilet tank with almost no effort. It’s quick, cost-effective, and best of all, requires minimal scrubbing. Here’s how it works.
Why You Should Clean Your Toilet Tank
Before diving into the cleaning method, it’s important to understand why maintaining a clean toilet tank is crucial. Over time, minerals from hard water, mold, mildew, and bacteria can accumulate inside the tank. This buildup can cause several issues:
Reduced Flushing Efficiency: Mineral deposits can clog the flushing mechanisms, making your toilet less effective.
Unpleasant Odors: Mold and mildew growth inside the tank can produce foul smells that permeate your bathroom.
Potential for Corrosion: Buildup can lead to corrosion of the metal parts inside the tank, leading to costly repairs or replacements.
Health Risks: Bacteria and mold can be harmful, especially if you have allergies or respiratory issues.
Given these reasons, it’s clear that keeping your toilet tank clean is essential for both your home’s hygiene and the longevity of your toilet.
The Trick My Grandpa Taught Me
My grandpa, who was always full of practical wisdom, showed me this trick for cleaning a toilet tank. The beauty of his method lies in its simplicity and effectiveness, requiring just a few household items you probably already have. Here’s what you’ll need:
White vinegar: Known for its natural cleaning and deodorizing properties, white vinegar helps break down mineral deposits, mold, and mildew.
Baking soda: This common kitchen ingredient is excellent for scrubbing and deodorizing.
A toilet brush or sponge: While this method minimizes scrubbing, a light brush or sponge can help remove any remaining buildup.
Step-by-Step Guide to Clean Your Toilet Tank
Step 1: Turn Off the Water Supply
First, locate the water supply valve behind your toilet and turn it off. This step is crucial to prevent water from refilling the tank while you’re cleaning. Once the valve is off, flush the toilet to drain the water from the tank. You may need to flush a couple of times to ensure all the water is out.
Step 2: Inspect the Tank
Before adding any cleaning agents, take a moment to inspect the inside of the tank. Look for any visible buildup, rust, or mold. This will give you an idea of how much cleaning is needed and where to focus your efforts.
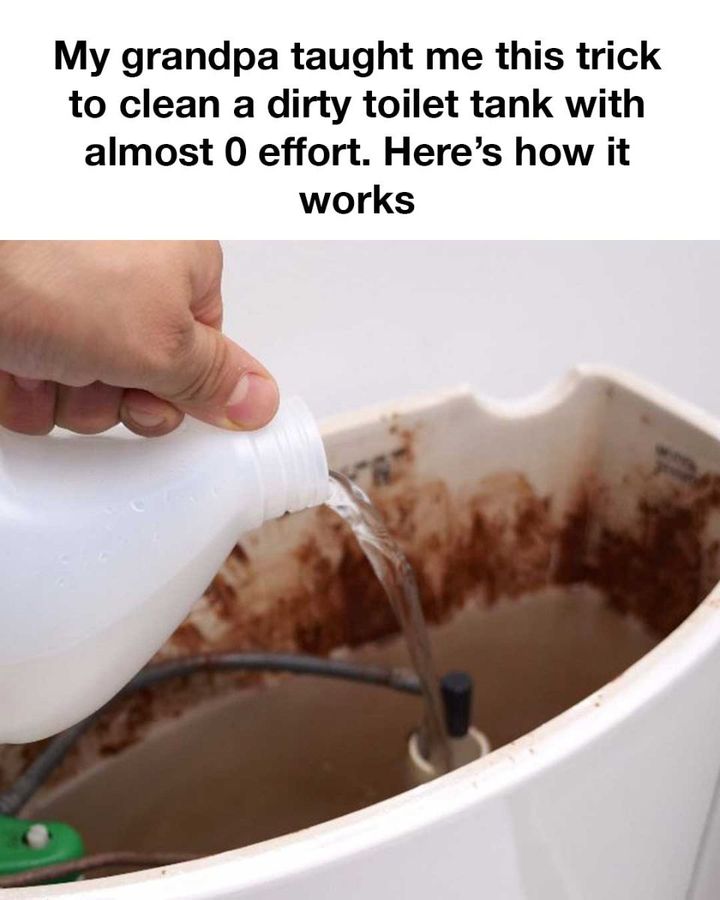
Step 3: Add Vinegar
Pour about 2 cups of white vinegar directly into the tank. Vinegar is a natural acid that breaks down mineral deposits and kills bacteria. Make sure to pour the vinegar around the edges of the tank to cover as much surface area as possible. Allow the vinegar to sit for about 10 minutes to start dissolving the buildup.
Step 4: Add Baking Soda
After the vinegar has had some time to work, sprinkle about 1 cup of baking soda into the tank. You will notice a fizzing reaction as the baking soda and vinegar mix. This reaction helps to lift grime and stains from the surfaces of the tank. The fizzing action is particularly effective at loosening stubborn deposits with minimal scrubbing.
Step 5: Let It Sit
Close the toilet lid and let the vinegar and baking soda mixture sit in the tank for about 1-2 hours. During this time, the solution will continue to break down any deposits, stains, and odors. For particularly dirty tanks, you can let the mixture sit overnight for maximum effectiveness.
Step 6: Light Scrubbing (If Needed)
After the soaking period, use a toilet brush or sponge to gently scrub any remaining buildup. The baking soda and vinegar will have loosened most of the dirt, so this step should require minimal effort. Focus on areas with visible grime or stains.
Step 7: Turn the Water Back On and Flush
Once you’ve finished scrubbing, turn the water supply valve back on and allow the tank to refill. Then, flush the toilet a couple of times to rinse out the vinegar and baking soda mixture. This will also help clear out any loosened debris.
Step 8: Regular Maintenance
To keep your toilet tank clean and fresh, repeat this process every few months. Regular maintenance will prevent heavy buildup from forming and keep your toilet functioning efficiently.
Why This Method Works
This method works so effectively because it combines the natural cleaning powers of vinegar and baking soda. Vinegar’s acidity helps dissolve mineral deposits, while baking soda’s alkaline nature neutralizes odors and acts as a mild abrasive to scrub away stains. Together, they create a powerful cleaning duo that requires minimal elbow grease.
Additional Tips for a Spotless Toilet Tank
Use a Toilet Tank Tablet: Between cleanings, consider dropping a toilet tank tablet that prevents buildup and keeps the water fresh.
Avoid Harsh Chemicals: Stick to natural cleaners like vinegar and baking soda. Harsh chemicals can corrode the internal components of your toilet tank.
Check Your Water Quality: If you have hard water, consider installing a water softener to reduce mineral buildup in your toilet tank and other plumbing fixtures.
Keeping your toilet tank clean doesn’t have to be a dreaded task. With this easy trick my grandpa taught me, you can clean a dirty toilet tank with almost zero effort, using just a few household ingredients. Regular maintenance not only keeps your bathroom smelling fresh but also extends the life of your toilet. So next time you notice your toilet isn’t flushing as well as it should, remember this simple method and give your tank a little TLC. Your future self will thank you!
